Many people wish to use IWStack to host various sites, while others have issues updating their operating system.
There are also some people which find the templates we offer insufficient, the 10 GB root disk size too small, or whatever other issues they may encounter.
This tutorial is aimed to help all people which wish to host multiple sites, with IWStack or not.
cPanel proves to be incompatible with our isolated network and the shared network offerings do not permit multiple IPs. cPanel's situation is similar with other paid panels which still force people to use IPv4 in order to control the licensing.
Therefore, we will be using here Virtualmin GPL, a fully functional hosting panel which includes webmin that can be used to keep your OS up to date, control firewall if you are using a shared network offering or a simple VPS for that matter and cannot use the IWStack external firewall offered by the isolated network's Virtual Router.
First we need to decide which size will be the disk. Note that you can always add more data disks for the VM in IWStack, however, it is simpler regarding the snapshots that you plan ahead and create a root disk which will contain all the installation, from the OS to the user data and web sites. Taking 2 snapshots instead of one while KVM does not allow simultaneous ones is a problem as there might be inconsistencies between the data on the root and data disks, for example, therefore, having the right sized root disk is important and should be the first choice when thinking of hosting. If you are an advanced user, you probably do not need this tutorial, though, and you can create any kind of setup.
OK, I think 60 GB will be enough for many sites or a couple of big ones, but you know better how big the data is and can grow, so plan accordingly, this template will be available for others to use it, therefore i plan for an average 60 GB.
Now, it is simple, I go and create a VM with a custom 60 GB disk and will install a simple Debian 7 on it.
Let's create the VM.
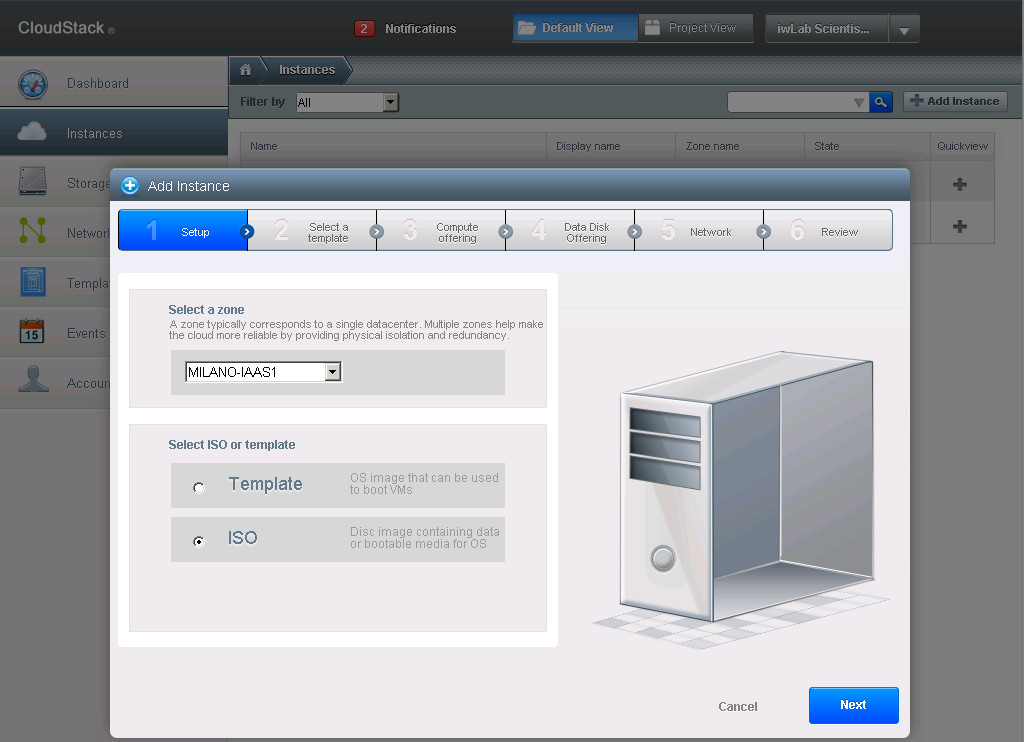
Go to your account, click instances to the left, then add instance in the upper left:

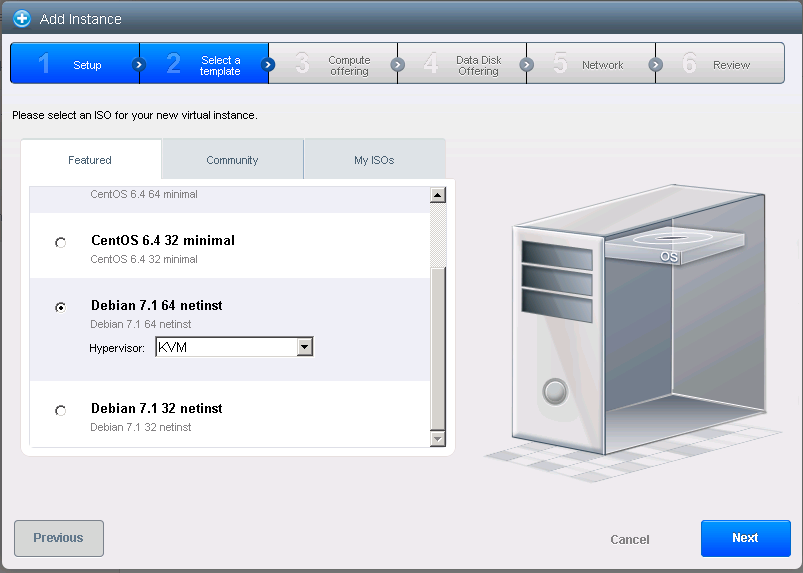
Notice I selected ISO as method of install, lets go further and select the Debian 7 amd64 minimal iso as we will install from net for various reasons, one is to make sure the network works and another to have the latest packages available.

If your preferred OS is not listed, you can link and upload your own ISO by going to templates, change the view to ISO and select Register ISO in the upper right corner. I prefer Debian because it is lean, fast and stable, but you can disagree, of course, and use another OS (we have quite a few ISOs, but I am sure not everyone will be happy with those, just make sure virtualmin supports those). I assume, however, that you need a fast-track install to end up with a fully functional platform for hosting your sites and wish to manage everything from a web interface, therefore I give you just that.
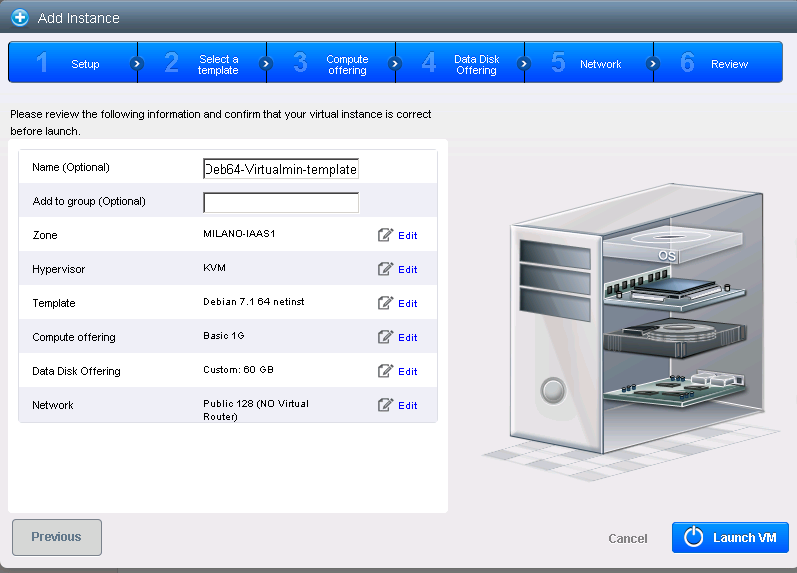
So, let's move on and create a disk of your preferred size (I will chose 60 GB) and then chose a network. For template making it is best to use a shared offering so we do not mess yet with firewall rules and all, you can see here: http://www.iwstack.com/tutorials/deploy ... ivate-net/ how to deploy the template once we have it in an isolated network. For the minimal template installation choose any ram offering, debian will work fine in all, but for virtualmin I suggest at least 1 GB compute offering. should look like this at the end:

Wait until the VM is created (a couple of minutes or so at most, if not done by then, click instances again to refresh view, it is likely that he UI java interface got stuck).
After the VM is ready, we need to proceed with the install (click the view console button in the menu that pops up after clicking the + sign at the right of the VM)
I normally choose the expert install and continue over the ssh, I suggest you also choose the expert install.
Installing debian is beyond the scope of this tutorial, but I will have to tell you a few things.
1. Make sure the hostname is a subdomain you own. Something like virtualmin.mydomain.com. There will be problems further down the line if you do not.
2. It is better you choose an expert install and do not install anything else except ssh, virtuamin install script will install everything else (deselect everything except ssh when offered with a choice of software to install).
3. At partitioning select guided partitioning and use entire disk.
4. It is better you allow login as root and do not create another account for now.
5. Leave network on autoconfig and use the garr.it mirror when offered (you should select Italy as location and US as keyboard language at least before you finish installing with the console and at least before we open more locations).
6. Install only the needed drivers for the system when asked about kernel.
7. You can opt to use non-free and contrib software. Not needed for basic config, but might be needed for advanced features of your web hosting platform.
8. It is possible to install a desktop in order to access the VM with VNC or RDP protocols, however, this will use a lot of space and some resources,
After the OS is installed, remove the ISO and reboot the VM.
Now, run thee ifconfig command in order to find out the IP and connect to it with ssh.
So, in putty use as user root and password whatever you put during the install.
Then, run these commands:
Code: Select all
wget http://software.virtualmin.com/gpl/scripts/install.shCode: Select all
chmod +x install.shCode: Select all
./install.shCode: Select all
Welcome to the Virtualmin GPL installer, version 1.1.0

 WARNING:

 The installation is quite stable and functional when run on a freshly
 installed supported Operating System.

 If you have existing websites, email users, or if you manually installed
 Virtualmin via a Webmin 'wbm' module, you are likely to run into problems.
 Please read the Virtualmin Administrators Guide before proceeding if
 your system is not a freshly installed and supported OS.

 This script is not intended to update your system!  It should only be
 used to perform your initial Virtualmin installation.  If you have previously
 run the Virtualmin installer, you can perform upgrades and updates from within
 Virtualmin itself, or using your system's package manager. Once Virtualmin is
 installed, you never need to run this script again.

 The systems currently supported by install.sh are:
 CentOS and RHEL 5-6 on i386 and x86_64
 Scientific Linux 6 on i386 and x86_64
 Debian 6.0 and 7.0 on i386 and amd64
 Ubuntu 8.04 LTS and 10.04 LTS, and 12.04 LTS on i386 and amd64
 Amazon Linux 2012.03 on i386 and x86_64
 FreeBSD 7.0 and 8 on i386 and amd64

 If your OS is not listed above, this script will fail.  More details
 about the systems supported by the script can be found here:

   http://www.virtualmin.com/os-support.html

 Continue? (y/n) y
Checking for HTTP client...found /usr/bin/wget -nv
Checking for perl...found /usr/bin/perl
2013-10-01 13:49:28 URL:http://software.virtualmin.com/lib/spinner [579/579] -> "spinner" [1]
Loading log4sh logging library...
2013-10-01 13:49:28 URL:http://software.virtualmin.com/lib/log4sh [21395/21395] -> "log4sh" [1]
INFO - Started installation log in /root/virtualmin-install.log
INFO - Checking for fully qualified hostname...
INFO - Hostname OK: fully qualified as virtualmin.100percent.info
INFO - Installing serial number and license key into /etc/virtualmin-license
INFO - Loading OS selection library...
2013-10-01 13:49:29 URL:http://software.virtualmin.com/lib/oschooser.pl [4461/4461] -> "oschooser.pl" [1]
INFO - Download of http://software.virtualmin.com/lib/oschooser.pl Succeeded.
INFO - Loading OS list...
2013-10-01 13:49:29 URL:http://software.virtualmin.com/lib/os_list.txt [3735/3735] -> "os_list.txt" [1]
INFO - Download of http://software.virtualmin.com/lib/os_list.txt Succeeded.
INFO - Operating system name:    Debian Linux
INFO - Operating system version: 7
INFO - Configuring package manager for Debian Linux 7...
INFO - Enabling universe repositories, if not already available...
INFO - Disabling cdrom repositories...
Hit http://mi.mirror.garr.it wheezy Release.gpg
Hit http://mi.mirror.garr.it wheezy-updates Release.gpg
Hit http://mi.mirror.garr.it wheezy Release
Hit http://mi.mirror.garr.it wheezy-updates Release
Hit http://mi.mirror.garr.it wheezy/main Sources
Hit http://mi.mirror.garr.it wheezy/contrib Sources
Hit http://mi.mirror.garr.it wheezy/main amd64 Packages
Hit http://mi.mirror.garr.it wheezy/contrib amd64 Packages
Hit http://mi.mirror.garr.it wheezy/contrib Translation-en
Hit http://mi.mirror.garr.it wheezy/main Translation-en
Hit http://mi.mirror.garr.it wheezy-updates/main Sources
Hit http://mi.mirror.garr.it wheezy-updates/contrib Sources
Hit http://mi.mirror.garr.it wheezy-updates/main amd64 Packages/DiffIndex
Hit http://mi.mirror.garr.it wheezy-updates/contrib amd64 Packages
Hit http://mi.mirror.garr.it wheezy-updates/contrib Translation-en
Hit http://mi.mirror.garr.it wheezy-updates/main Translation-en/DiffIndex
Hit http://security.debian.org wheezy/updates Release.gpg
Hit http://security.debian.org wheezy/updates Release
Hit http://security.debian.org wheezy/updates/main Sources
Hit http://security.debian.org wheezy/updates/contrib Sources
Hit http://security.debian.org wheezy/updates/main amd64 Packages
Hit http://security.debian.org wheezy/updates/contrib amd64 Packages
Hit http://security.debian.org wheezy/updates/contrib Translation-en
Hit http://security.debian.org wheezy/updates/main Translation-en
Reading package lists... Done
INFO - Cleaning up apt headers and packages, so we can start fresh...
INFO -
2013-10-01 13:49:33 URL:http://software.virtualmin.com/lib/apt.conf.noninteractive [243/243] -> "apt.conf.noninteractive" [1]
INFO - Download of http://software.virtualmin.com/lib/apt.conf.noninteractive Succeeded.
INFO - Installing Webmin and Virtualmin package signing keys...
2013-10-01 13:49:33 URL:http://software.virtualmin.com/lib/RPM-GPG-KEY-virtualmin [1690/1690] -> "RPM-GPG-KEY-virtualmin" [1]
INFO - Download of http://software.virtualmin.com/lib/RPM-GPG-KEY-virtualmin Succeeded.
2013-10-01 13:49:34 URL:http://software.virtualmin.com/lib/RPM-GPG-KEY-webmin [1320/1320] -> "RPM-GPG-KEY-webmin" [1]
INFO - Download of http://software.virtualmin.com/lib/RPM-GPG-KEY-webmin Succeeded.
INFO - OK
INFO - OK
INFO - Hit
INFO - Removing Debian standard Webmin package, if they exist...
INFO - Removing Debian apache packages...
INFO - Installing dependencies using command: /usr/bin/apt-get --config-file apt.conf.noninteractive -y --force-yes install postfix postfix-pcre webmin usermin ruby libapache2-mod-ruby libxml-simple-perl libcrypt-ssleay-perl unzip zip libfcgi-dev bind9 spamassassin spamc procmail libnet-ssleay-perl libpg-perl libdbd-pg-perl libdbd-mysql-perl quota iptables openssl python mailman subversion ruby irb rdoc ri mysql-server mysql-client mysql-common postgresql postgresql-client awstats webalizer dovecot-common dovecot-imapd dovecot-pop3d proftpd libcrypt-ssleay-perl awstats clamav-base clamav-daemon clamav clamav-freshclam clamav-docs clamav-testfiles libapache2-mod-fcgid apache2-suexec-custom scponly apache2 apache2-doc libapache2-svn libsasl2-2 libsasl2-modules sasl2-bin php-pear php5 php5-cgi libgd2-xpm libapache2-mod-php5 php5-mysql
...in progress, please wait...
Extracting templates from packages: 100%
Extracting templates from packages: 100%
......................................................................................................................................................................
INFO - /usr/bin/apt-get --config-file apt.conf.noninteractive -y --force-yes install postfix postfix-pcre webmin usermin ruby libapache2-mod-ruby libxml-simple-perl libcrypt-ssleay-perl unzip zip libfcgi-dev bind9 spamassassin spamc procmail libnet-ssleay-perl libpg-perl libdbd-pg-perl libdbd-mysql-perl quota iptables openssl python mailman subversion ruby irb rdoc ri mysql-server mysql-client mysql-common postgresql postgresql-client awstats webalizer dovecot-common dovecot-imapd dovecot-pop3d proftpd libcrypt-ssleay-perl awstats clamav-base clamav-daemon clamav clamav-freshclam clamav-docs clamav-testfiles libapache2-mod-fcgid apache2-suexec-custom scponly apache2 apache2-doc libapache2-svn libsasl2-2 libsasl2-modules sasl2-bin php-pear php5 php5-cgi libgd2-xpm libapache2-mod-php5 php5-mysql: Succeeded.
INFO -  Succeeded.
INFO - Installing Virtualmin and all related packages now using the command:
INFO - /usr/bin/apt-get --config-file apt.conf.noninteractive -y --force-yes install virtualmin-base
...in progress, please wait...
.................................................................................
INFO - /usr/bin/apt-get --config-file apt.conf.noninteractive -y --force-yes install virtualmin-base: Succeeded.
INFO - Checking for updates to Virtualmin-related packages...
...in progress, please wait...
.
INFO - /usr/bin/apt-get --config-file apt.conf.noninteractive -y --force-yes install postfix postfix-pcre webmin usermin ruby libapache2-mod-ruby libxml-simple-perl libcrypt-ssleay-perl unzip zip libfcgi-dev bind9 spamassassin spamc procmail libnet-ssleay-perl libpg-perl libdbd-pg-perl libdbd-mysql-perl quota iptables openssl python mailman subversion ruby irb rdoc ri mysql-server mysql-client mysql-common postgresql postgresql-client awstats webalizer dovecot-common dovecot-imapd dovecot-pop3d proftpd libcrypt-ssleay-perl awstats clamav-base clamav-daemon clamav clamav-freshclam clamav-docs clamav-testfiles libapache2-mod-fcgid apache2-suexec-custom scponly apache2 apache2-doc libapache2-svn libsasl2-2 libsasl2-modules sasl2-bin php-pear php5 php5-cgi libgd2-xpm libapache2-mod-php5 php5-mysql: Succeeded.
INFO - Updating SpamAssassin rules...
INFO - Rule updates done
open your browser and go to https://yourip:10000
User root
password is the root password you chose when you installed debian.
You will see the post installation wizard like this:

I recommend you use at least 1 GB ram and then you can use all the features for a few sites. The more ram, the better :) If you are low on ram and you dont need spam-assasin, antivirus since you are not running email servers there, disable those. If you are pretty sure you will never need them, disable them anyway, that is recommended if you do not use your mail on this server, but note it is a fully functional mail server and you can run your own away from government eyes.
At mysql settings report less memory unless your sites are really database intensive and would benefit a lot from caching requests in case of heavy access.
I recommend load everything in ram and you will have much better performance. If you only host 1 site with 10-20 mails a day, and 100 visitors or so, that is not needed, but, in general, it is.
For DNS, if you wish to use own (cpanel style), add them as ns1.yourdomain.com and ns2.yourdomain.com, then check the skip check for resovability box.
At passwords only store them hashed.
Also, make sure you remember the mysql password, you will probably need it later.
That is about it. We can already start hosting our sites.
Much more details about how to use virtualmin here: http://www.virtualmin.com/documentation/tutorial
Now, I will make this a template and soon it will be available for everyone.
(work in progress)
